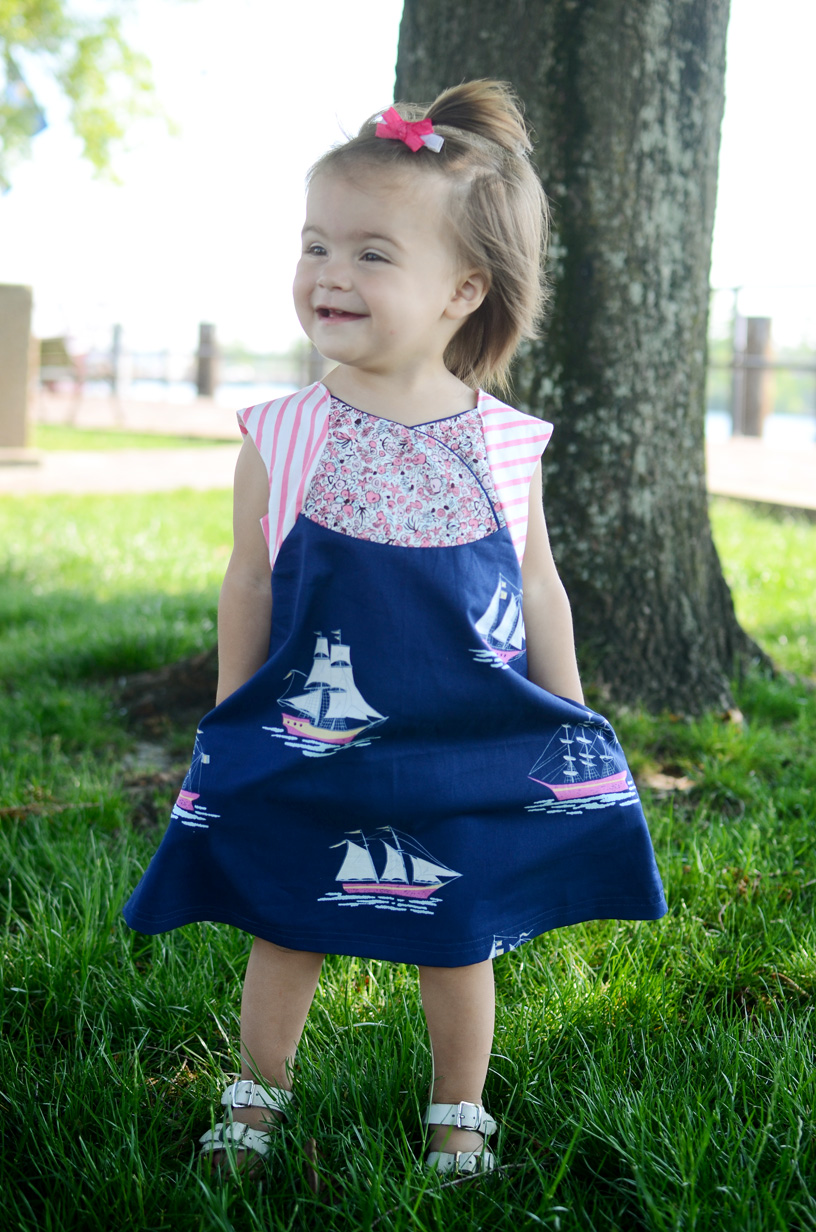
It’s been awhile since I did a sewing post. I recently bought the Fawn Lily dress pattern from Willow and Co. Willow and Co. is a pattern collective, whereby a bunch of super talented pattern makers have released an amazing collection of patterns. As soon as I saw the Fawn Lily pictures from the testers, I knew I had to try this one out. I love how it’s very simple, but still has just the right touch of uniqueness to make it really stand out. In a sea of ruffle gowns and pillow cases dresses, something like this was a nice break from the norm. Here’s a picture of the finished dress; I’ll review the pattern after the pic.
 I made the dress in a size 18 mos for my 20 lb. 19 month old. It fits her really well with plenty of room to grow. I don’t expect that she will outgrow it before summer is over, so i’m very happy with the sizing. The pattern has a bunch of options (crossover yoke, button yoke, cap sleeve, pleated sleeve, gather skirt, a-line skirt, ect.), but I went with the crossover yoke w/ piping, the A-line skirt, and the cap sleeve. The dress can be over the knee length, above the knee, or tunic length. I actually cut the dress for the above the knee length, but my little mamma is pretty small, so it fit a little bit longer than it typically would.
The instructions and pattern pieces for this dress were great. I had no issues getting the pieces to line up. I didn’t realize that there were three separate pieces for the three types of skirt options (A-line, gathered, and pleated), so I printed all three of them. If you were smarter than me and realized that in advance, you wouldnt have to print as many pieces and I did. Just a heads up! Like I said, the instructions were great. I didn’t follow them to a “t,” but if I had wanted to construct the dress the way the pattern called for, it would have been no problem. I was kinda in a hurry and wasnt worried about exposed seams on the inside, but if you wanted a nicer finish, the instructions allow for that.
Overall, I am super happy with the way the dress turned out. It has no button or zipper closures, and getting it over my DD’s head was not an issue. If your little one has a big head, it might be a little snug; I’m thinking the button yoke would open a little bit more than the crossover one if you’re unsure. The pattern says that it it suitable for an experienced beginner. I would agree, but it’s definitely going to stretch an experienced beginner seamstress if you do it the way the instructions advocate. It took me about 4 hours total to make this dress with a lot of interruptions. I think making it in a bigger size would have been much easier, because there are some parts that were tedious simply because of the scale I was making. Willow and Co. has a bunch of great looks out right now and I can’t wait to try some of the other ones. The Persimmon Dress is calling my name!
You can see and purchase the pattern at……http://www.willowandcopatterns.com/shop/fawn-lily-tunic-dress/ (sorry it’s not a hot link. i need blogging lessons.)
I just love the crossover bodice. I used flat piping (bias tape cut in 1/2) to edge it out. The instructions also show how to use piping along the lower curved edge as well.
Can you tell that someone is obsessed with pockets…

Such a great lightweight summer dress. I’d love to see a seersucker or double gauze version.
.jpg)
Back of the dress. Like the bodice, the instructions also show how to edge out the bottom curve of the yoke with piping if you prefer.


Contrast pockets


